Assembling a Bed Frame Made Simple with Expert Tips


The box is open, the bedroom is already crowded, and a cheerful pile of bolts has appeared where the dog usually naps. In a small Milwaukee bedroom, that's often the moment a simple bed project starts feeling like a furniture puzzle. The good news is that assembling a bed frame goes much more smoothly when the room, hardware, and assembly order are handled before the first bolt gets tightened.
Bed frames also deserve more care than their flat-pack appearance suggests. U.S. consumer-product injury data estimate roughly 697,169 emergency-room-treated injuries per year involving beds or bed frames, with a 15.3% hospitalization rate and a 0.1% fatality rate. The same dataset reports annual injuries rising from 750,328 to 999,298 between 2020 and 2024, a 33.2% increase over five years. Those figures don't mean every assembly is dangerous, but they do underline why lifting, alignment, hard edges, and secure hardware deserve attention.
Getting Ready to Build Your Bed Frame
A Greenfield homeowner crouching on the carpet with cardboard underfoot, a headboard leaning against the wall, and a dog inspecting every box has already reached the most important part of the project. Before tools come out, the room needs to become a temporary work area. That small pause often separates a clean build from an afternoon of moving parts around, discovering a missing fastener, and rebuilding a joint that was assembled backward.
Clear a working area about the size of the finished frame, plus enough room to walk around each side. A folded blanket, moving pad, or flattened carton protects the floor and keeps finished wood from picking up scratches while the rails are turned over. Remove bedding and set the mattress somewhere safe, because it becomes an obstacle surprisingly quickly.
Check the route before assembly
Measure the bedroom doorway, hallway turns, stair landings, and any tight passage between the entry door and the room. A frame may fit through in separate pieces but become difficult to move once the headboard and rails are connected. Storage beds and broad headboards deserve special attention, especially in older Milwaukee homes with narrow doorways or tight stairwells.
The room itself matters, too. Look for floor transitions, thick rugs, vents, and baseboards that could prevent a rail from sitting flush. If the bed will rest near a wall, leave enough space to attach hardware without trapping a hand between the frame and drywall.
Open the right things first
Keep the instruction sheet, parts list, and slat hardware together. Some packages contain sealed bags for later steps, and opening every bag at once makes sorting harder. A quick look at the parts of a bed can also help identify the headboard, footboard, rails, slats, center support, and feet before the pieces are scattered across the room.
Practical rule: A missing part is easy to report before assembly begins, but much harder to identify after several similar bolts have been installed.
Self-assembly furniture has become a familiar part of modern furniture buying. Industry guidance commonly describes many bed-frame builds as roughly 1 hour and often a 2-person job, reflecting the weight and modular construction of many designs. (bed-frame assembly guidance and self-assembly furniture context) Treat those time estimates as a planning aid, not a promise. A small metal frame may move quickly, while a heavy solid-wood frame takes more care.
Tools, Workspace, and Hardware You Will Need
The included Allen wrench can finish the job, but it usually isn't the most comfortable choice for a long row of bolts. A small collection of household tools makes assembling a bed frame easier without turning the project into a workshop.
Set out the following before touching the hardware:
- Hex driver or Allen key: Use the included key for final hand-tightening, or pair a cordless drill with the correct hex bit for gentle initial threading.
- Rubber mallet: Tap dowels into place without marking wood. A metal hammer can bruise finished surfaces.
- #2 Phillips screwdriver: Many slat brackets and flat-head screws use this familiar profile.
- Small adjustable wrench: Hold nuts or bolt heads that turn while the joint is tightened.
- Tape measure: Measure the frame and compare corner-to-corner diagonals.
- 4-foot level: Check whether rails and center supports sit evenly.
- Flashlight: Shine into recessed holes, especially when barrel nuts or washers are difficult to see.
- Blanket or moving pad: Protect the headboard and side rails while they're on the floor.
Sort hardware by the step
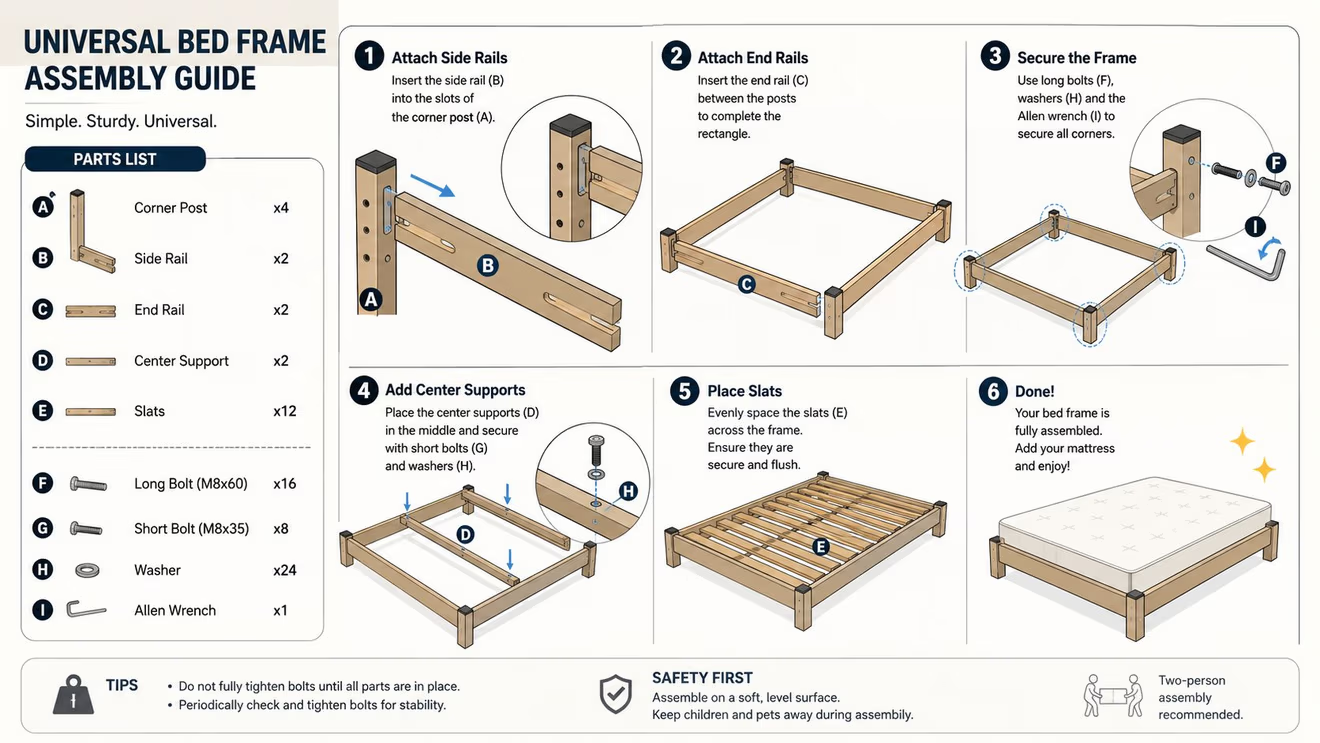
Shallow bowls, muffin tins, or labeled cups work better than one large pile. Group fasteners by step number and length, not just by the bag they came in. One instruction set, for example, identifies bolts measuring M6 x 90 mm, 70 mm, 30 mm, and 25 mm, along with dowels, an Allen key, and #8 x 30 mm flat-head screws. It directs the longest bolts through pre-drilled headboard-post holes, which shows why a short bolt in the wrong location can affect the joint. (bed-frame hardware specifications)
Before assembly, compare every piece with the parts list. Look for bent dowels, split edges, damaged threads, missing washers, and holes that appear blocked by finish. Photographing a questionable part before it gets installed can make a replacement conversation much easier.
A furniture slider can help move a heavy assembled frame across a hard surface, but it shouldn't be used to drag a loaded bed or force a crooked frame into position. For concrete floors and heavy pieces, review the guidance on heavy-duty furniture sliders and protect both the floor and the frame feet.
The Universal Assembly Sequence That Works Every Time
Most bed frames share the same structural order even when their styles differ. The materials may be metal, solid wood, or upholstered panels, but the frame still needs connected ends, aligned rails, proper mattress support, and a final level check.
Start by laying each part near its eventual location. Put the headboard at the top of the work area, the footboard opposite it, and the side rails along the sides. Keep slats, center beams, legs, brackets, washers, and nuts within reach. This arrangement reduces the chance of flipping a rail or installing a bracket on the wrong side.
Build the frame loosely
Connect the side rails to the headboard and footboard first. Insert every required washer and lock component, then bring the fasteners to finger tight. The joints should hold together, but the frame must still have enough movement to settle into alignment.
That looseness is intentional. A frame with one corner fully tightened can resist the remaining rails, forcing the builder to pull holes into position. That extra force can damage threads, split wood, or leave the frame twisted.
Add the center support before installing the final slats. For queen and king frames, a center beam with floor-contact legs is a major part of the load path. A reinforcement guide explains that beds spanning 60 to 76 inches need this support to help prevent sagging, with the beam running lengthwise through the exact middle of the frame.
Square before final tightening
Install the slats or platform deck without forcing them into place. Measure from one inside corner to the opposite inside corner, then compare that measurement with the other diagonal. Unequal diagonals indicate that the frame isn't square, which usually means a rail is under strain or a joint isn't seated correctly.
Adjust the rails by hand until both diagonals match as closely as the design allows. Check that the frame sits flush where intended, that the center legs contact the floor, and that no corner rocks. Then tighten the fasteners in a cross or star pattern, moving from one corner to the opposite corner rather than circling around the frame.
Independent assembly guidance attributes over 41% of “defective” furniture returns to premature tightening, incorrect hardware sequencing, and torque-related mistakes. It recommends the correct driver bit and warns against forcing fasteners with power tools. (fastener torque and assembly sequencing guidance)
Finish by checking headboard brackets, slat screws, support feet, and any storage mechanism. Apply only the pressure needed to secure each connection. A tight bolt is useful. A crushed panel or stripped head isn't.
Adapting the Steps for Different Bed Frame Types
The universal sequence provides a reliable skeleton, but each frame type creates a different trouble spot. A low platform, a roll-up slat system, a metal frame, and a solid-wood Amish frame shouldn't be approached with exactly the same expectations.
| Frame Type | Key Build Step | Common Pitfall | Estimated Time |
|---|---|---|---|
| Platform frame | Lock the low base together and verify the deck is seated | Assuming pre-attached slats need no inspection | About 1 hour |
| Slatted frame | Center the beam and secure slats or retaining straps | Allowing slats to shift during use | About 1 hour |
| Metal frame | Align corner brackets and side rails before tightening | Stripping thin metal by overtightening | About 1 hour |
| Solid-wood Amish frame | Seat dowels and bolt-through joints carefully | Underestimating weight and handling needs | About 1 hour, often with 2 people |
Platform beds typically put the attention on the base and deck. Pre-attached slats still need a visual check for gaps, loose screws, and proper seating. Foam mattresses may have specific support requirements, so the mattress documentation should be checked before the deck is covered.
Slatted frames need restraint
Roll-style slats can look finished as soon as they unroll, but the center rail must be straight and the retaining straps, hook-and-loop fasteners, or snaps must be secured as designed. If the slats can slide sideways during a dry test, they aren't ready for the mattress.
Metal frames often use corner brackets, bolts, and tuck-in rails. The metal may flex into place more readily than wood, but thin steel can deform when a builder leans too heavily on a wrench. Hand-tightening first gives the brackets a chance to align.
Solid-wood Amish frames bring a different trade-off. They may arrive partially assembled, but their weight, dowels, long bolts, and bolt-through construction call for two-person handling. Buyers comparing designs can review the different types of beds before deciding which structure fits the room and the household.
Hardware, Center Support, and Squeak Prevention
A bed frame doesn't stay stable because every fastener looks similar. Hex bolts, barrel nuts, flat washers, spring washers, and bed washers each have a job, and replacing one with whatever happens to be in a junk drawer can weaken the connection.
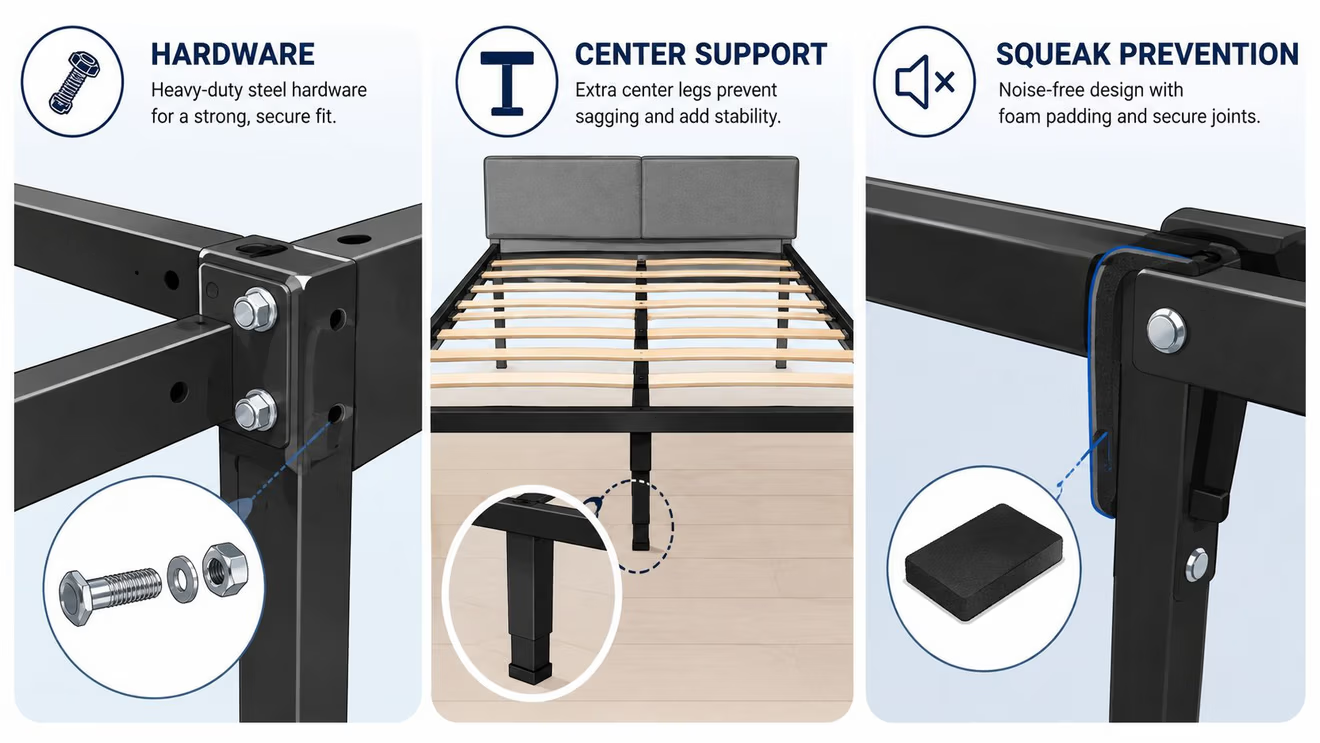
Flat washers spread pressure over the rail surface. Spring washers or locking hardware help resist loosening. Barrel nuts provide a threaded receiver inside certain rails, while machine bolts draw the joint together. A wood screw isn't a substitute for a machine bolt in a connection designed for through-bolting. One assembly guide specifically calls for bolts with flat washers, spring washers, and bed washers, then says all bolts should be tightened only after every bolt is in place. (washer and bolt sequence guidance)
Give the mattress a supported middle
Queen and king frames need the center support installed correctly, not just placed somewhere underneath. The beam should run through the middle, and each support leg should reach the floor without rocking. A leg that stops just above the floor contributes little, while a leg that lifts the side rails can distort the frame.
A center beam also helps control side-to-side movement. If the bed sways when someone sits on the edge, check the center support, corner joints, and floor contact before blaming the mattress.
Quiet the contact points
Squeaks usually come from movement between parts. Each bolt should be snug, but excessive force can crush wood fibers, deform metal, or strip a fastener. Felt tape between a slat and its contact rail can reduce rubbing, while a very thin application of clear paste wax can quiet metal-on-metal contact where the design permits it.
Quiet-bed habit: After the mattress is placed, apply gentle pressure at each corner and listen before adding bedding or storage underneath.
Wood can settle as the bedroom's humidity changes. A follow-up inspection after the frame has lived in the room for a while can catch a loosened joint early. If a squeak appears, identify the exact contact point rather than tightening every bolt indiscriminately. Shoppers looking for a more substantial structure can review strong bed-frame construction while comparing materials and support layouts.
DIY Versus Professional Assembly for Heavy Frames
“Easy assembly” usually describes the number of steps, not the difficulty of handling the parts. A lightweight frame on a clear floor may suit a capable homeowner, while a solid-wood frame with a broad headboard, drawers, or a lift mechanism changes the job completely.
The decision should start with the room, not the instruction sheet:
- Available help: Can two adults safely lift and rotate the largest pieces?
- Access route: Do stairs, narrow doors, or sharp hallway turns make carrying risky?
- Tools: Are the correct drivers, wrenches, level, and measuring tools available?
- Time: Is there enough uninterrupted time to sort hardware and correct alignment?
- Damage risk: Would a stripped bolt, scratched floor, or marked wall cost more trouble than expected?
A heavy frame can also be awkward before it becomes structurally difficult. One person may be able to hold a rail while starting a bolt, but that doesn't mean the person should carry a headboard alone or balance a frame against a wall.
When professional setup makes sense
Professional assembly is particularly sensible for heavy solid wood, custom headboards, storage beds, and bedrooms with limited maneuvering space. The service decision also becomes easier when the assembly fee is small compared with the cost of the frame and the consequences of a damaged finish.
BILTRITE's furniture assembly service addresses bedroom pieces such as bed frames that need proper alignment for supports and related parts. A homeowner who prefers help can ask what delivery, placement, and assembly include before scheduling.
Decision rule: If the frame is heavy, the room is tight, and suitable help isn't available, paying for setup can be the practical choice rather than an admission of defeat.
DIY still makes sense for a straightforward frame when the parts are manageable and the builder can work patiently. The right question isn't whether the box says “simple.” It's whether the household can complete the job safely, without rushing the alignment or lifting stages.
Finishing Touches and When to Visit the Showroom
The final inspection should happen before the mattress goes on. Confirm that the headboard and footboard use the correct bolts, the side rails sit evenly, the slats are fully seated, and every support leg reaches the floor. Push gently at each corner and along the sides. A frame that rocks empty won't become stable under a mattress.
Check compatibility before covering the support system. Foam mattresses may require particular slat spacing, while an adjustable base needs adequate interior clearance and a frame designed to accommodate its movement. The mattress instructions and bed-frame documentation should agree before the room is put back together.
Keep a small final checklist
- Frame shape: Both diagonals match, and the rails aren't visibly bowed.
- Hardware: Every required bolt, washer, nut, and screw is installed.
- Center support: The beam is centered, and its legs make firm floor contact.
- Level: The frame doesn't rock across the floor or at the corners.
- Mattress fit: The support surface matches the mattress requirements.
- Room clearance: Doors, drawers, vents, and walking paths remain usable.
- Noise test: Gentle pressure produces no new squeaks or shifting.
A showroom visit can solve problems that a product photo can't. Bring room measurements, pictures of narrow doorways, notes about sloped ceilings, and questions about finish, fabric protection, replacement hardware, or delivery setup. BILTRITE Furniture-Leather-Mattresses is a fourth-generation, family-owned Greenfield business serving Metro Milwaukee since 1928, with sales associates who have over 400 years of combined experience. The store carries American-made, Amish-made, solid-wood, small-scale, and heavy-duty furniture, along with a mattress department offering over 60 models. (BILTRITE bed-frame assembly guidance)
The team can help match a frame to the room, the sleeper, and the budget without treating assembly questions as an afterthought. Since BILTRITE doesn't sell online, the showroom experience gives shoppers a chance to sit, inspect construction, compare heights, and discuss delivery or setup in person. The store is closed on Sundays and Mondays for family time, so checking the schedule before heading to 5430 West Layton Avenue in Greenfield, Wisconsin is a smart final step.
BILTRITE Furniture-Leather-Mattresses offers affordable, better-quality furniture, USA-made and Amish-made solid-wood options, and a mattress department with over 60 models to help complete a bedroom setup. Bring room measurements and doorway photos to BILTRITE Furniture-Leather-Mattresses, and the Greenfield team can help find a frame and setup approach that fits the space.